 Thin Theme Documentation
The purpose of the files in the package
- INSTALL_ADDON_ThinTheme_vX_X_410x-4xx_cs_cart_version_XXXX-XX-XX.zip – add-on installation Thin Theme
- icons_pack_for_menu from_demo.zip – this is an archive that contains the icons used in the demo, they are as auxiliary material. it’s not an addon.
- layouts_ThinTheme_blog_05252017.zip – this is a blog layout. It’s not an addon. Installation
- ath_pie_vX_X_435-45x_cs_cart_version_XXXX-XX-XX.zip – package to install the add-on “Product Image Effects” (installation not required)
- previous_and_next_vX_X_XXXX-XX-XX.zip – package to install the add-on “Previous and Next Product” (installation not required)
- Checkout_layout_for_4.10.1.zip – this is a Checkout layout to upgrade to CS-Cart 4.10.1
- Banners_PSD_ThinTheme-1.zip this is an archive that contains the banners psd used in the demo, they are as auxiliary material. it’s not an addon.
- Theme packages for older CS-Cart versions are available on request
Installation – top
1. Uploading
- Download the add-on
- Go to Admin panel > Add-ons > Manage Add-ons
- Click on [+] to open upload modal window
- Please choose whatever is comfortable for you:
– Local: zip archive is saved on your computer
– Server: zip archive is uploaded on your server
– URL: you have a direct link to the zip archive - After you selected the zip archive corresponding to your current version of CS-Cart please click Upload & install
2. License Activation
- Open add-on settings page Admin panel > Add-ons > Manage Add-ons >
[TH] Thin Theme Settings - In Activation tab insert License key
- Save the settings and go back to Manage Add-ons page
- In the same line with the name of the add-on, click Active
- Clear cache, choose Administration > Storage > Clear cache
3. Theme Activation
- Go to Admin panel > Design > Themes
- Then you can activate the theme in the Installed theme tab
That’s all, the theme is installed
The demonstration banners will be installed automatically, Extended Menu requires independent settings
Change logo – top
It is possible to use SVG logo in this theme
- Optimize SVG file, you can use online service SVGOMG!
- Open the file in a text editor and copy the text
- Go to Admin panel > Design > Layouts
- Deactivate block Logo
- Activate block Logo SVG
- Press [gear] and select Content tab
- Insert the text of your file between the lines
<a title="{$logos.theme.image.alt}" href="{">
svg code
</a>
SVG is a vector format, so scaling the image quality doesn’t deteriorate. Also when you add the SVG as described above, there is no additional request to the server.
To replace the logo on the image
- Go to Design > Themes
- Press Visual Editor in front of the currently active layout
- In the new tab, you will see your shop with Theme editor panel
- In CUSTOMIZE selector choose Logos
- After editing save your changes by pressing Save and press [X] to close editor
Change colors – top
- Go to Design > Themes
- Press Visual Editor in front of the currently active layout
- In the new tab, you will see your shop with Theme editor panel
- In CUSTOMIZE selector choose Colors
- After editing save your changes by pressing Save and press [X] to close editor
Change styles – top
Style files add-on should not be changed, this can lead to incorrect work of the add-on. If there was a need to redefine or add styles, please use Theme editor for this
- Go to Design > Themes
- Press Visual Editor in front of the currently active layout
- In the new tab, you will see your shop with Theme editor panel
- In CUSTOMIZE selector choose Custom CSS
- In textarea your can add your styles
- After editing save your changes by pressing Save and press [X] to close editor
Full-width section – top
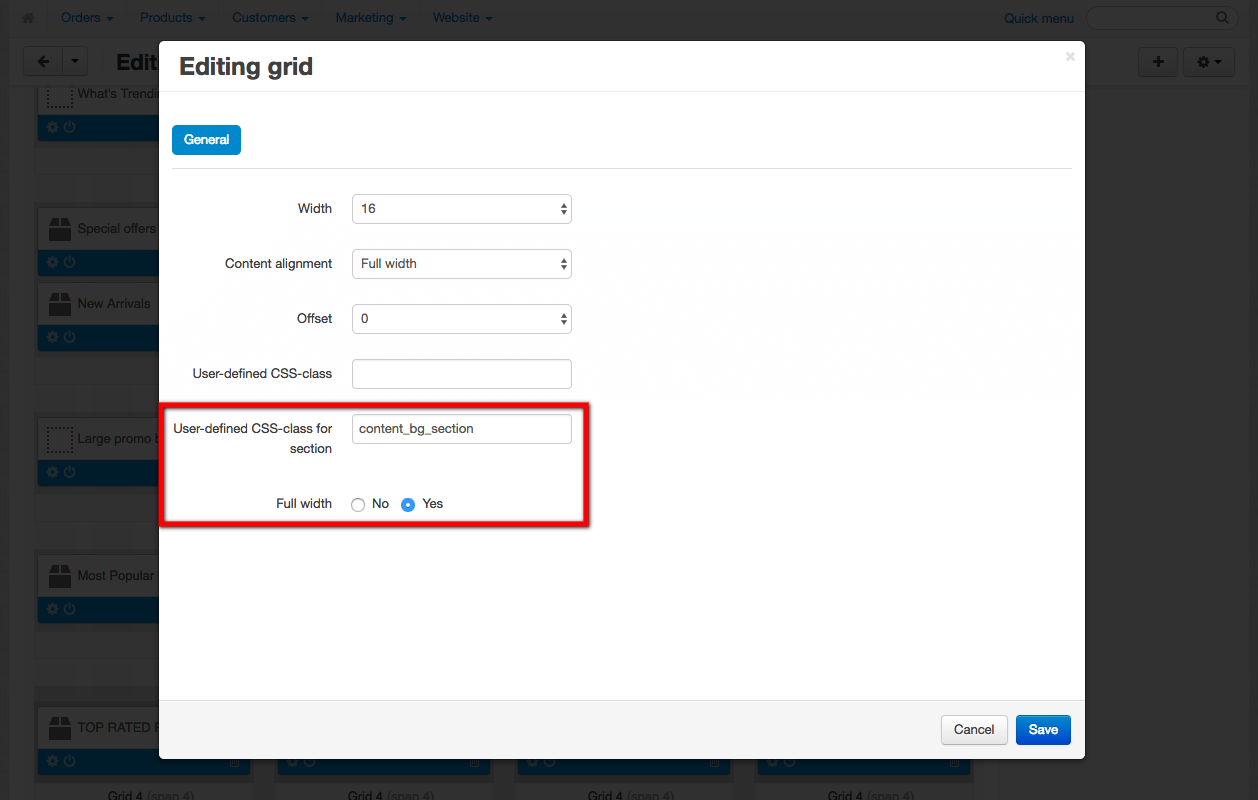
You can easily make the section to full width
In grid settings added User-defined CSS class for section and Fullwidth
For their appearance, it is necessary to fulfill two conditions
- The grid has no parent
- Width – 16
Theme already has classes that specify background
- .content_bg_section – Special background
- .accent_bg_section – Main accent color
Banners with text – top
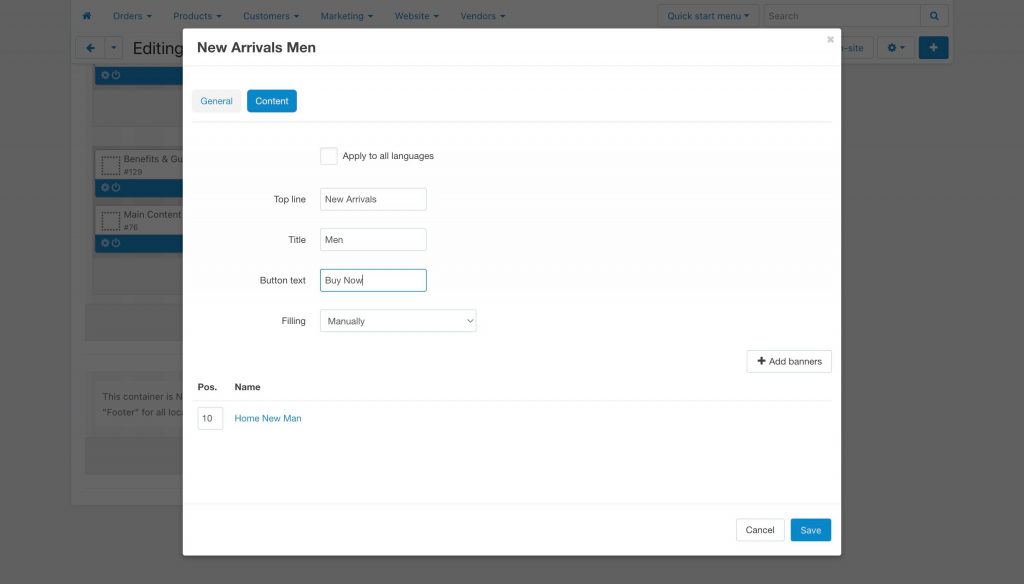
In the content section, you can specify the text for the [TH] One Banner block
To specify the text for all languages – select the appropriate check mark in the content settings
[*Deprecated*]
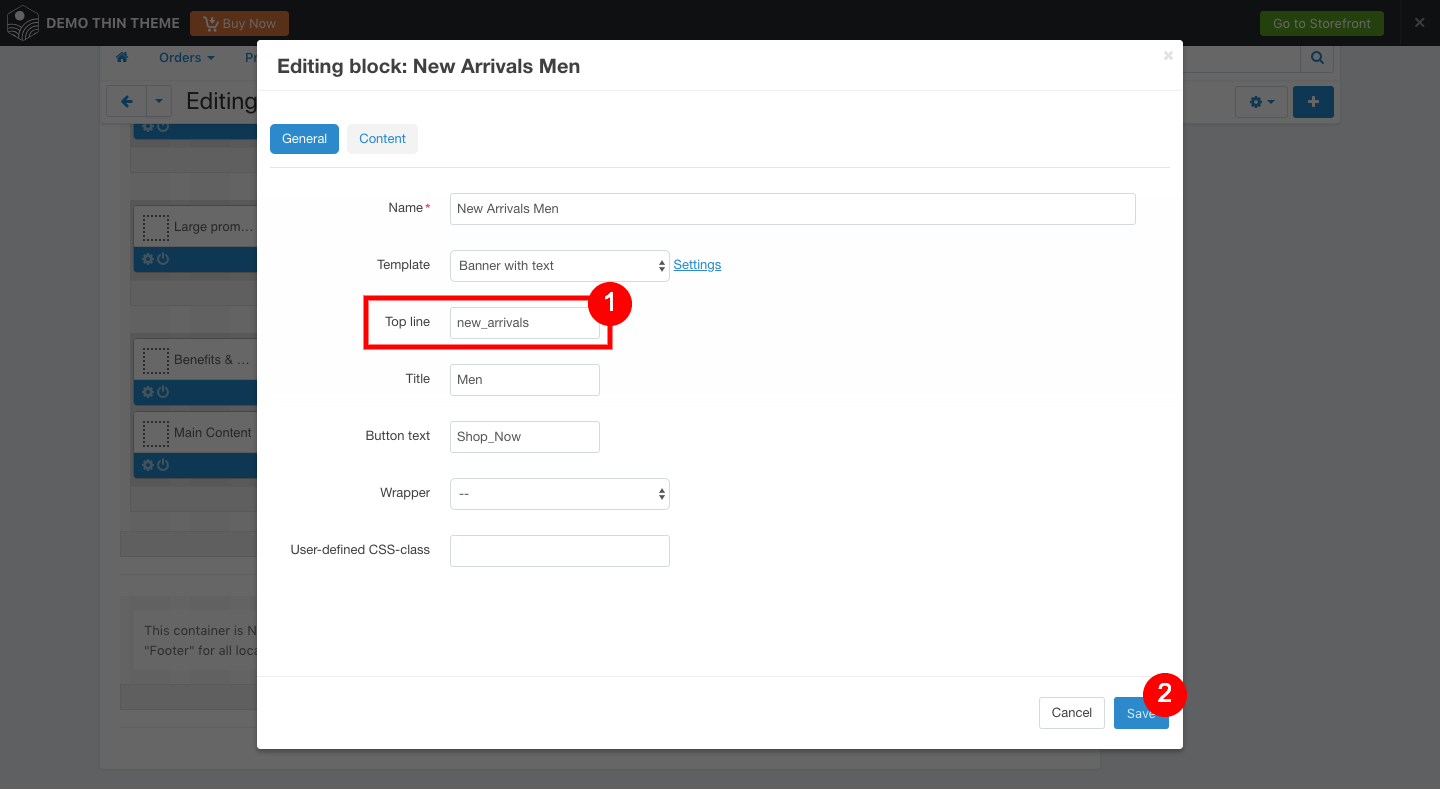
Added another option to display banners. Text on the graphic banner is added from the block. The text is set in the form of language variables.
Example:
Add a new variable new_arrivals to the block and save the block
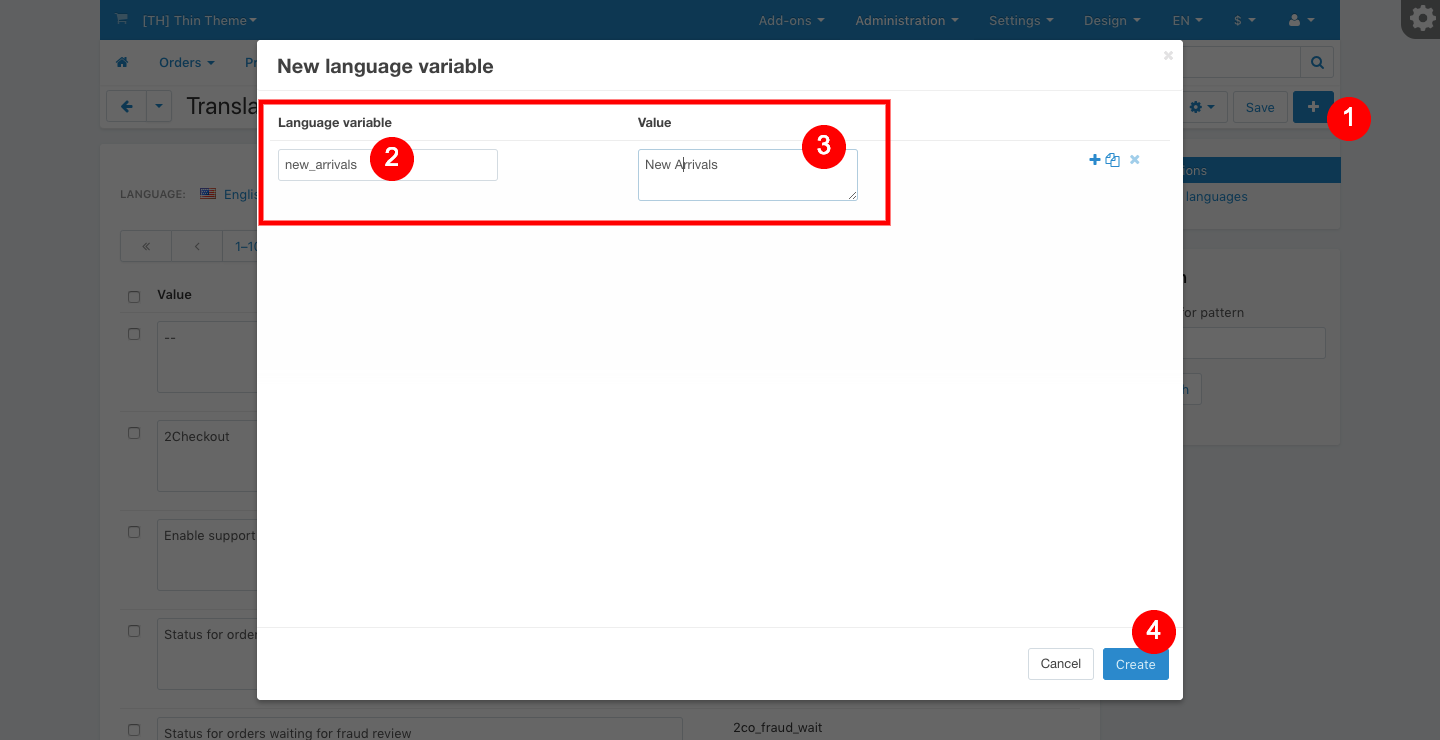
- Go to Administration > Languages > Translations
- Click on [+] to add new language variable
- Add a variable and its translation, (2) and (3)
- Press Create button
For a variable, use Latin letters without spaces
✅ Correctly:
text_for_example
❌ Not correct:
текст для примера
G) Extended Menu – top
Create Extended Menu
- Go to Admin panel > Design > Menus
- Click on [+] to open “New menu” modal window
- Enter name and please click Create
- Select new menu
- Click on [+] to open “New item” modal window
The menu items of the 1st level have two types
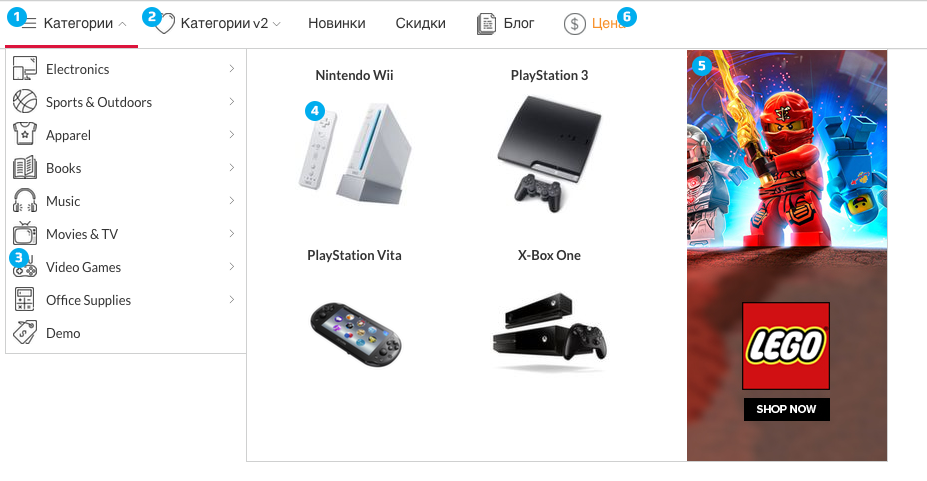
- Full category tree (1) – display all categories and category banners

- Default – display menu items and submenu
 Options:
- Display type – specifies how to display submenu
- Float right (9) – sets the alignment of the element on the right edge
- Icon (2) – the image for the menu item
- SVG Icon (2) – field to insert SVG code
The menu items of the 2nd level have two types
- Default (8) – menu items display as menu by default
- Text (7) – display wiziwig content
Full category tree
It created automatically. Content is defined in the settings page, category
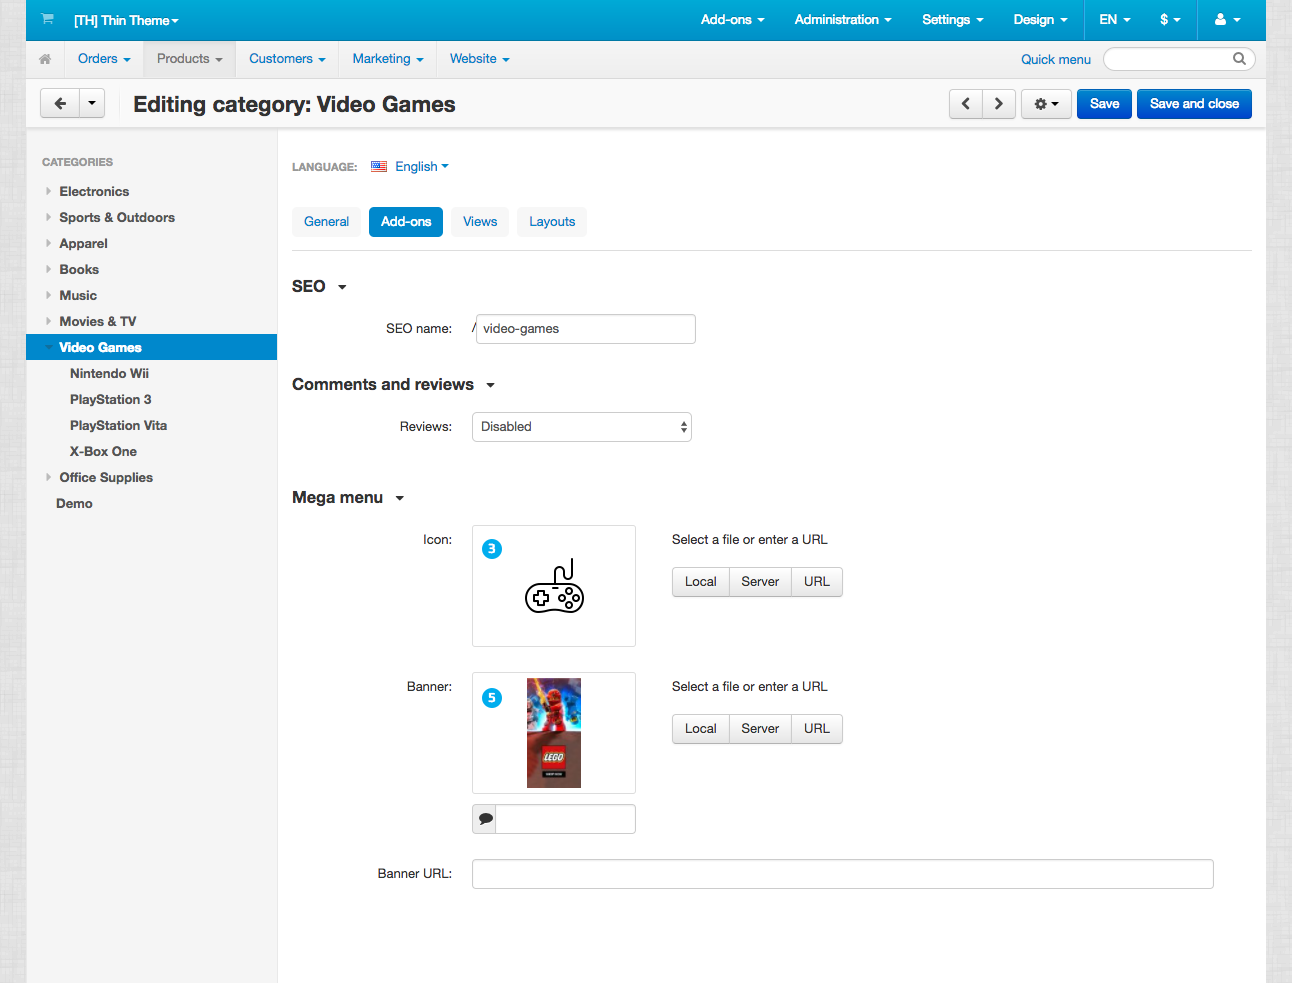
- Icon (3) – icon for the item in the menu
- SVG Icon (3) – field to insert SVG code
- Banner (5) – promotional banner for the first-level categories
- Banner URL – link for promo banner
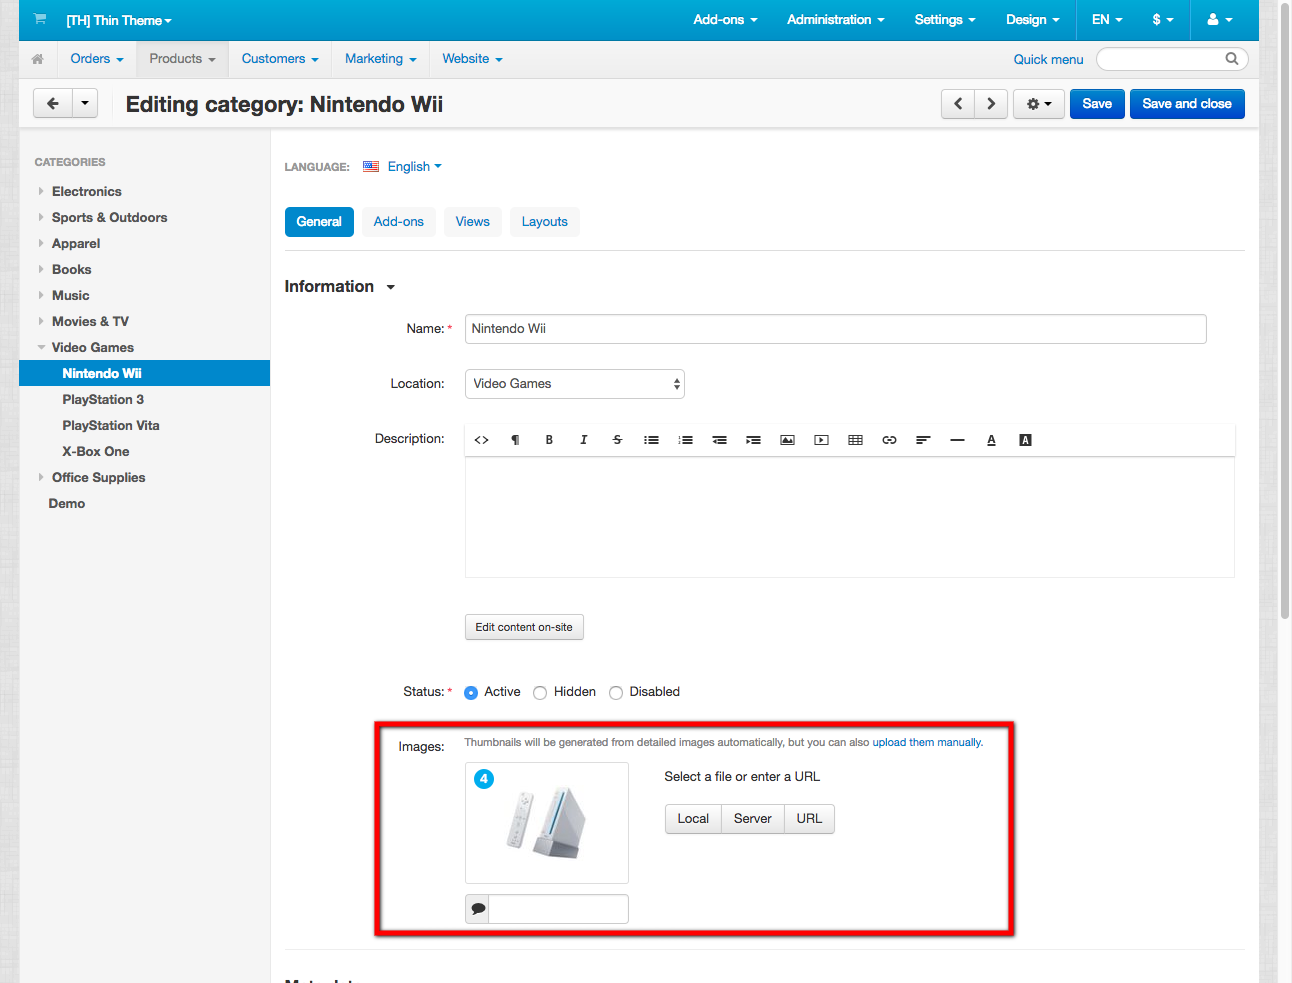
- Images (4) – displayed under the name of the category
To create the menu item “Contacts”, follow these steps.
Create item “Contacts”, select
- Content type: default
- Display type: List
- Float right: selected
Create sub-item “Info”
- Parent element: Contacts
- Type of content: Text
- Custom CSS class: ath_mega-menu__contacts
In the visual editor, choose the mode “Code” and insert the following HTML:
<h4><i class="icon-tt-pin"></i> Address:</h4>
<p>3993 Hanover Street, <br>New York, NY 10016
</p>
<p><br>
</p>
<h4><i class="icon-tt-mail"></i> Email:</h4>
<p><a href="mailto:sales@example.com">sales@example.com</a>
</p>
<p><br>
</p>
<h4><i class="icon-tt-phone"></i> Phone:</h4>
<p>+1 917-722-7425
</p>
<p>(free call)
</p>
<p><br>
</p>
<h4><i class="icon-tt-clock"></i> Opening hours</h4>
<p>10:00 — 6:00
</p>
<p>From Monday to Friday
</p>
When the menu is ready, go to Admin panel > Design > Layouts and in the MegaMenu in tab Content select the created menu
Important! Extended Menu for the main menu of the site, it is therefore recommended to use only one menu of this type.
H) Category catalog – top
The number of columns on category page is set in the add-on settings
I) Blog – top
In the theme there is stylized add-on Blog by SIMTECH company included in the default CS-Cart
layouts_ThinTheme_blog_05252017.zip – this is a blog layout, to install it follow these steps
- Go to Design > Layouts > Gear next to the plus > Import layout
- In the opened window select Update current layout > Override locations by dispatch
- Upload the unzip file
The number of columns on the blog page is set in the add-on settings
J) Iconic font – top
The theme uses an icon font:
![]()
In order to change the icon, for example – in unit free shipping, you need to replace the following code
<i class="icon-tt-gift"></i>
to
<i class="icon-tt-clock"></i>
this will replace the gift icon to the clock icon.
K) Theme Update – top
Starting from version 3.22, updates are installed through the Upgrade center
Administration > Upgrade center
To upgrade to 3.22, follow these steps:
- Make a full backup of the store
- Close the store
- Install the theme add-on over the old version without removing the previous one. To do this, select “I know the risks and want to use the dangerous way.” and “Use the dangerous way” button. Otherwise, your settings will be erased
- If necessary, update the language variables and add-on settings (more information)
- Clear the cache
- If necessary, make changes that can be erased during the upgrade if you changed the theme files directly
- Check that everything is successfully updated
- Open the store
To update language variables and add-on settings:
- Go to developer mode
- For this file local_conf.php add define(‘DEVELOPMENT’, true);
If you do not have a file, create one. - Clear the cache
- On the add-ons page in the drop-down list next to the add-on “[TH] Thin Theme Settings” select “Update”
- Return to normal store mode
For stores using color schemes created before version 3.0
- On the themes page, switch to the color scheme “Crimson”
- Run the “Theme Editor”
- Select your color scheme and save it.
- The new color variables will be set to white. Replace them if necessary.
You can update alone or contact with us via support@themehills.com
Update layout to CS-Cart 4.10.1
Checkout_layout_for_4.10.1.zip – this is a Checkout layout, to install it follow these steps
- Go to Design > Layouts > Gear next to the plus > Import layout
- In the opened window select Update current layout > Override locations by dispatch
- Upload the unzipped file
Theme update for CS-Cart 4.11.3
After the standard theme update process, you must change the color scheme
In the file design/themes/thin_theme/styles/data/<Your_color_scheme>.less
Add less variables:
//checkout
@checkout_selected_control_border: #4fbe31;
@checkout_control_border: #acbdcd;
@checkout_input_border: #acbdcd;
@checkout_selected_input_border: #4fbe31;
@checkout_step_title: #2e3a47;
@checkout_input_text: #2e3a47;
@checkout_input_label: #a1a6aa;
@checkout_control_background: #fff;
@checkout_selected_control_background: #fff;
@checkout_control_title: #4fbe31;
@checkout_control_description: #6c6c6c;
@checkout_control_label: #2e3a47;
@checkout_terms_background: #f9f9f9;
L) FAQ (Frequently asked questions) – top
-
Error: File is too large. Max uploading size is 2M.
Unzip it and upload via FTP with the replacement of duplicate files.
– OR –
Contact your system administrator that would increase the ability to upload files larger than 2M. -
How to make a menu item “Contacts” like on the demo
The method described in paragraph Extended Menu
-
How to make the blocks with banners “popular” in 4 or 5 columns?
This requires replacing the custom classes for the section “col_3 col_3–special” to “col_4 col_4–special” and “col_5 col_5–special” accordingly
-
How do I change the default vendor logo?
Change the file design/themes/thin_theme/media/images/logo.png to your own and clear the cache.
-
Part of the image in the main banner is cropped
This is done specifically to smooth out the difference in the proportions of banners
To remove this effect, remove the custom classth_home-main-bannersfrom the section where the banner block is located (home page layout)
Changelog
4.01 (12 Mar 2025)
Improvements in script and template performance
Fixed a visual bug on the product detail page when using quantity-based discounts

4.00 (30 Mar 2024)
Added support for mega wishlist
Updated styles
Legacy code has been removed
The license system has been updated

3.33 (26 Jul 2023)
Fonts are hosted locally
4.17.1 support

3.32(01 June 2023)
Fixed structure editor on frontend
Remove cmsmagazine metatag

3.31 (28 Feb 2023)
Fix color schemes for menu
Languages variables updated
Added the new banner block with button
Layouts updated

3.30 (01 Feb 2023)
Updated layouts for new installations of CS-Cart version 4.16.1
In old installations, when changing content in Smarty blocks, you need to create a new copy of it

3.29 (15 Jul 2022)
Fix in the license system
If you have www in your domain, and you don't see the new version in the update center, then install the new theme add-on on top of the old one (in a dangerous way - without erasing data in the database)

3.28 (05 Jul 2022)
The "Price per unit" add-on has been adapted
Updates in the license system (www ignored)
Fix in styles
Deleted:
/design/themes/thin_theme/templates/views/products/quick_view.tpl
/var/themes_repository/thin_theme/templates/views/products/quick_view.tpl

3.27 (22 Jun 2022)
Mandatory update for CS-Cart 4.15.1 and higher
Fixes in templates and styles
When updating manually, you need to delete these files:
/design/themes/thin_theme/templates/common/product_data.tpl
/var/themes_repository/thin_theme/templates/common/product_data.tpl
(it is better to update through the update center)

3.26 (24 May 2022)
Fix for styles for the detailed product page
Fix for styles for the extended menu for the tablet view
Fixes in the top panel

3.25 (04 Feb 2022)
Updated styles
Added new SVG icons for Stripe and SberPay
Fix for the mailing module
Fix for RTL

3.24 (06 Dec 2021)
Added support for CS-Cart 4.14.1
(update required)
Added a hook to the extended menu
Updated styles

3.23 (24 Jun 2021)
Fixes in styles and templates for products that are out of stock

3.22 (10 Mar 2021)
Integrated the update system through the Upgrade center

3.21 (04 Dec 2020)
Updated the theme for compatibility with CS-Cart 4.12.1
Fixed a bug related to the HiDPI displays support add-on

3.20 (17 Jul 2020)
Fix for the vendor page when the Comments and reviews add-on is disabled

3.19 (18 Jun 2020)
Updates for Multivendor editions
Added a new block " Extended grid of vendor logos"

3.18 (17 Jun 2020)
Added a setting for positioning the menu button on the mobile view
Replaced the lazy load script
Fix for the Instagram module
Fixes in the extended menu

3.17 (21 May 2020)
Updated the product detail page template
Fixes in the extended menu

3.16 (29 Mar 2020)
Fixed arrows for detailed images
Changed the style of icons that close popups
Changed the style of delete icons
design/themes/thin_theme/css/other_styles.less

3.15 (12 Mar 2020)
Fixed arrows at the carousel of products
design/themes/thin_theme/css/blocks/list_templates/scroller.less

3.14 (11 Mar 2020)
Added sticky menu for the desktop and sticky header for a mobile view when scrolling
Added a new payment system icon: Carte Bleue (France)
You can disable the car icon for the "free shipping" label

3.13 (20 Feb 2020)
--!Before updating, let us know if you have Multi-Vendor Ultimate!--
Updated "Product Image Effects” add-on
Fixed displaying products as a grid

3.12 (19 Feb 2020)
Fixed labels (free shipping)
Updated styles
Updated the license system
Added language variables

3.11 (05 Feb 2020)
Added compatibility with CS-Cart 4.11.3
Modified file design/themes/thin_theme/styles/schema.json
and LESS files in the folder design/themes/thin_theme/styles/data

3.10 (19 Nov 2019)
Fixed bug with additional fields in sections for layouts

3.09 (07 Nov 2019)
Update for 4.11.1
Updated styles and templates

3.08 (20 Sep 2019)
Updated templates of the theme for better compatibility with 4.10.x
Bug fixes labels on the detail page
Added ability to hide text near profile icon
Added setting to move category description down under products

3.07 (26 Aug 2019)
Added icons of payment systems:
- Apple Pay
- Google Pay
Updated icon font, added:
- WhatsApp
- Viber
Added setting return percentage in labels discount

3.06 (17 Jul 2019)
Update for 4.10.3
(/design/themes/thin_theme/templates/blocks/product_templates/default_template.tpl)
Updated layouts
Language variables updated

3.05 (10 Jul 2019)
Updated layout, fixed bug when installing
The functionality of "block full-width" moved to hook
Changed block "SVG icons of payment systems"
Minor fixes to styles

3.04 (02 Jun 2019)
Update for 4.10.1

3.03 (20 Dec 2018)
fix extended menu

3.02 (14 Dec 2018)
color scheme fixes
fixed compatibility with mega menu add-on

3.01 (23 Nov 2018)
correction of add-on priority for correct work with banners

3.00 (19 Nov 2018)
5 new color schemes
changed SVG block of payment system icons
updated layouts
added language variables
new color settings in the theme editor
fixed working rtl menu for Android
changed the work of searching by categories

2.21 (1 Oct 2018)
fixes for extended menu
changed the priority of the add-on

2.20 (9 Sept 2018)
fixes for extended menu
added a block with categories to the layout

2.19 (9 Apr 2018)
license update
fix RTL
fix layouts
fix banners

2.18 (28 Feb 2018)
license update

2.17 (9 Feb 2018)
updated templates to 4.7.2
new updated block list of vendors

2.16 (9 Jan 2018)
updated product date for correct operation of the list of variations on the item card
updated the item card

2.15 (6 Dec 2017)
fixed Lazy Load for IE

2.14 (29 Nov 2017)
added Russian layout
block with categories fixed
added a backup menu

2.13 (3 Nov 2017)
added block with categories

2.12 (31 Oct 2017)
mega menu add-on support
Emerald Theme support

2.11 (21 Oct 2017)
Fix Lazy Load
Information about unavailability of the license server

2.10 (21 Sept 2017)
Fix for mega menu on desktop

2.7 (7 March 2017)
multivendor support
added the ability to make blocks in the section of new items on 4 and 5 columns
added banner on sale page
added image for Gift certificates page
the mega menu added the ability to hide the price and language
in the mega menu added setting the number of items in the display " number of categories"
corrections
Russian documentation

2.6 (16 February 2017)
added display of “buy in one click " buttons”
attached hook on the detailed page of products:add_to_cart

2.5 (13 February 2017)
fixes: columns in wysiwyg, added background for text
updated icon files: added Vkontakte and Odnoklassniki

2.9 (29 Jun 2017)
fix the layout
support for new features for multivendor
in test mode we added lazyload for images (it is possible to disable it)
ability to limit the number of items for mega menu
many fixes for RTL version
added ability to specify sizes for blog images
improved theme settings during installation

 Options: